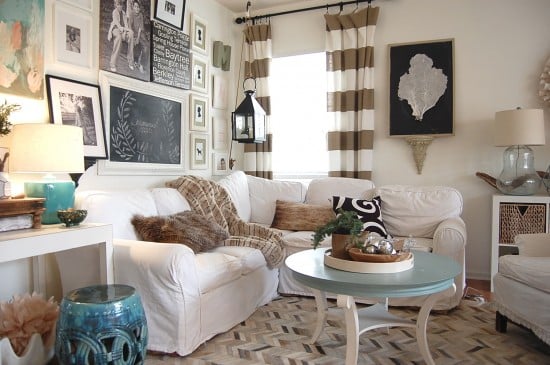
I had just shown my husband how a round table looked in her living room and convinced him we needed a round one in our living room too....It would just work better with the layout we have and give our family of four more room to move about than the current Ikea one did.
 |
| {via} |
I mean look, just LOOK! It is THE very same table! I couldn't believe my eyes! Now being a new groupie to the blog world, I was kinda star struck. I was giddy and shy and just didn't know what to say so I just stared..........at the craigslist post and then The Nester's family room. Should I, Could I? Twenty dollars, SAY WHAT!? Why yes I think I will! Here is my living room with the new addition back in January.
It had a very dark finish on it. Not quite black, but very dark cherry, almost. I had planned on painting the piece from the moment I got it. However, when I got really close in the right light I could see a beautiful wood grain underneath that finish. The existing finish was doing absolutely nothing for the wood grain.
Since I spied some pretty wood grain, I thought I'd try to do a two-tone finish on it with a wood tone top and a color on the bottom. The top of the table was clearly a veneer, but I took a chance and stripped it anyway. If it didn't work, I figured I could always paint it right? I bought some Citristrip stripping gel to remove the dark stain from the top. I followed the manufacturer's directions and protected my work area with a tarp, builder paper and a drop cloth. I used all three, layered, since I was working indoors.
I applied the gel liberally to the top and let it go to town.
Do you see the grayish/white spots? At first I thought it was drying. I tested a spot with my trusty plastic scraper and it wasn't dry at all. It was just working its magic. I let the gel sit until I couldn't resist it any longer which was about 15 minutes. I didn't want the veneer to lift, so I went ahead and scraped away. This stuff is AMAZING!!! The old finish slid off like melted butter. Easy Peasy Lemon Squeezy!
TA-DA!! Pretty wood grain! Really, isn't it just so pretty!
Yippee, it worked & the veneer was still intact! Now, this is where I hit a small snag. There wasn't any veneer on the edges of the top. (Does that make sense?) It was only on the top. So there wasn't anything to strip down to wood grain, just pressed wood. So I tweaked my plan just a tad. (You've gotta go with the flow when refinishing furniture!) I wasn't crazy about the natural wood color against our hardwood floors, so I toned it down with a white wash. I used Annie Sloan Chalk Paint in Old White, mixed with water, on the top. The mixture was probably about 3 parts water to one part paint. I just brushed it on and wiped it off with a soft cloth until I got the effect I was looking for. After the top was just right, I brushed some more Old White on the edges of the top and went over it with some dark wax so it would sort of blend with the white washed wood tone on the top.
For the bottom I mixed up some of Miss Mustard Seed's Milk Paint in Lucketts Green with some bonding agent and went to town painting the bottom of the table. Below is the finished product after some distressing, some clear wax & some dark wax.
I just love the milk paint! It distressed beautifully and has such a pretty, mottled color to it. LOVE IT!! I will certainly be using it again! (I have some Mustard Seed Yellow just begging to be used for a future project!)
In the picture below, you can hardly tell that the edge of the top isn't the same as the top itself. I was so pleased with the final result.
Now we have our own unique coffee table, in our own unique style! That is what I love most about painting & refinishing furniture. You can make it your own. Even when you have the same coffee table as The Nester, it can still look completely different and work in your home too. Sa-weet!!
Here's a final before & after
Tell me, how do you bring a sense of uniqueness to your home?? Last week I shared how I got to help bring a sense of uniqueness to my Sister-in-Laws house.
linking up at:
******************************************
Disclosure: This post contains affiliate links.


