Tuesday, August 13, 2013

Shed to Schoolhouse Side no. 1

I'm back with an update on Side no.1 of our "Shed to Schoolhouse" project.  A few days ago I shared the before pictures of our backyard shed and our plan for it.  Right now we are focusing on the exterior of the shed because it was in BAAAD shape.  Also, it needs to be sealed (no holes or openings) completely before we do any work inside.  My husband and I began slowly working on side no. 1 back in February.  He works full time, so we work mostly in the evenings and on weekends (when we don't have plans).  It has truly been a team effort thus far.  Over the summer I've been able to work some on it during the day while my girls play outside (or watch too many cartoons....hehehe).  Our first step was to pry off all of the battens and decide which boards would need to be replaced.  Then we had to decide the height that would be our "half way" mark to cut the boards.  It took some discussion and trial and error because we needed to make sure the height that we chose would work all the way around the building.  Once we decided on the height, we snapped a chalk line across the shed.  Next, my husband set our circular saw to the depth of the boards and cut the side in half.  The picture below shows you the side "in half" with the left side of the door ready to have the plank siding put on.  We had also installed the new door.  The new door makes such a big difference!  The natural light that floods in through the panes is great.  The interior definitely needed more light!       


We purchased an outswing door which is sealed differently than an inswing door.  The previous door was not an outswing door, it was rigged to be one which is why it was rusted and in such poor condition.  Elements (i.e. wind, rain, ice, high temps) can really wreak havoc on buildings when things are not properly installed and maintained.  Moisture especially can really mess things up!!  That has been a huge lesson for us throughout this process so we are taking care to do everything right.  

The next picture shows several battens in place, 3 planks up and the place where the window is going to go.  I want to say here that JamesHardie products are HARD!!  A hammer and nail and plain ole' saw blade was not going to cut it(haha, no pun intended)!!  After many bent nails and some research, we ended up investing in a roofing nailer and a special blade for our circular saw.  Both saved us a ton of time and effort!     


Once we snapped our chalk lines, the planks went up fairly quickly.  Below shows the rest of the planks up before we added the window and the trim.  The tan/yellowish color is the way the planks and trim come.  We plan to paint after all four sides are complete.  Plus, we have a ton of caulking to do!  Exterior caulk has to set-up for several days, sometimes as long as 10 days depending on the humidity, before it can be painted.  

Something really cool happened as we put our planks up.  The planks come in a 12 foot length.  Per installation instructions, a gap minimum of 1/8 inch is supposed to be left between the planks and the vertical trim.  Well, the length of the planking ended up being exactly 12' and 1/8" which left our gaps on either side of the plank between 1/4 to 1/8 inch!!  Folks, we absolutely did not plan it this way!!  It simply just worked out this way!! (I don't believe it was just coincidence either.  Only God could have had it work out so perfectly!  And yes, I totally believe that He works everything out from the tiniest detail to the biggest in our lives.)      


The next picture brings us to the almost completion of Side no. 1 of this Shed to School house renovation!!  The small window has been installed as well as the battens completed too.  We still need to change out the floodlight with something prettier, power wash that metal roof and of course paint.  However, it is quite the transformation already!!  We are so pleased!  


We are hoping to complete all four sides by the end of August.  For now, I will leave you with the unbelievable before and after of side no. 1.

Now, on to Side no. 2!  Be back soon with an update!

Wednesday, August 7, 2013

From a Shed to a Schoolhouse We Go......hopefully

I introduce you to our backyard shed.  Yep, it's pretty bad.  (as I hang my head in shame...)  

Side "no. 1"

Our house was built in the 1930s.  This building must have been used as a garage.  We're not sure whether it is the same age as the house or not.  Either way, it is still pretty old.  At some point, a previous owner finished out the interior and put in a bathroom.  It was dark and dingy and hadn't been used for anything other than a storage space in a long time.  Shortly after my husband and I got married, we decided to rip out the dark, stained paneling and replace it with a brighter bead board paneling.  As we pulled off the paneling, we found 'old' termite damage.  Old meaning they were no longer active because we did not find any trace of them.  Gotta love that, right!  For anyone that has never dealt with termites, they eat wood.  A lot of wood in a fairly small amount of time.  As they eat the wood, they leave behind a dirt type substance.  It was gross with a capital G!  It needed some major TLC.  Then life happened,  we had babies and we never went any further with the renovation.  It became a catch all for anything and everything from tools to baby monitors to fishing poles.  Storage was not exactly what we had envisioned the space being used for.  

Side "no. 2"

It's got potential though, 320 sq feet and 1 bathroom worth of potential!!  Oh yeah!!  Our house is small so we will take what we can get when it comes to extra square footage.  We plan to use the space as a homeschool room/guest room and a workspace for my husband and myself.  We were gonna call it "The Shed to Cottage Makeover" but then my husband called it "The Schoolhouse" and it has kind of stuck.    

Do you see in the above pictures how bad the wood is around the bottom of the building??  It is like that all the way around.  Side 1 is the worst though!  The siding is traditional board and batten with 1" x 12" boards all the way around with 3" battens over the joints.  Some boards are completely bad while others are bad only toward the bottom.  Most of the battens are in rough shape as well.    

Side "no. 3


Side "no. 4"
Obviously, we need to get the exterior shaped up before we can start on the interior.  Replacing every board and batten will not be very cost effective as one 1" x 12"-8 ft long board costs $11.29 at our local McCoy's Building Supply.  The price is even higher at the "big box" hardware stores.  Several of the boards are longer than 8 ft which means a higher price there too.  

We have tossed around several ideas.  One is HardiePanel siding with HardieTrim for the same board and batten look.  We like the board and batten style but this option still wasn't cost effective since we would basically be re-siding the entire shed.  We are hoping to save as much material already on the shed as we can.  We put our thinking caps on.  Together we decided to join 2 styles together, Board and Batten on the top half of the shed and Lap Siding on the bottom.  


We will cut off the bottom half of the boards and install HardiePlank Lap Siding that will match the look of the siding on our house.  This way we can save the boards that are still in good shape.  We will replace the boards that are bad at the top, replace all the battens with HardieTrim battens, which will hold up better in our climate, and repaint the whole thing.  Here is the best sample I could come up with of our vision.  

Shed Possibility

In the sample above, I added a small window next to the door and replaced the door with one that has a window.  My husband's work space will be where the small window is placed.  This window will give him more natural light there and also lets us look into our back yard so we can keep an eye on our little ones.  I also show the window on side "no. 2" a little larger.  I am hoping to convince my husband to switch the windows from side "no. 3" to side "no.2" and vice versa.  I'll explain this move a little later when I show you some interior pictures.  

Over the summer, we started putting our plan into action so I'll be back with an update soon!  Our goal completion date is September 3rd.

Thursday, June 27, 2013

"It's The Nester's coffee table!!!" I exclaimed.

Yep, that's what I giddyly (<--is that a word?) exclaimed when I found this coffee table on craigslist.


I had just shown my husband how a round table looked in her living room and convinced him we needed a round one in our living room too....It would just work better with the layout we have and give our family of four more room to move about than the current Ikea one did.
{via}

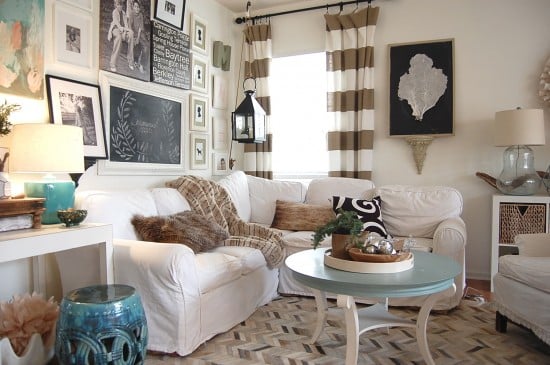
I mean look, just LOOK!  It is THE very same table!  I couldn't believe my eyes! Now being a new groupie to the blog world, I was kinda star struck.  I was giddy and shy and just didn't know what to say so I just stared..........at the craigslist post and then The Nester's family room. Should I, Could I?  Twenty dollars, SAY WHAT!?  Why yes I think I will!  Here is my living room with the new addition back in January.


It had a very dark finish on it.  Not quite black, but very dark cherry, almost.  I had planned on painting the piece from the moment I got it.  However, when I got really close in the right light I could see a beautiful wood grain underneath that finish.  The existing finish was doing absolutely nothing for the wood grain.


Since I spied some pretty wood grain, I thought I'd try to do a two-tone finish on it with a wood tone top and a color on the bottom.  The top of the table was clearly a veneer, but I took a chance and stripped it anyway.  If it didn't work, I figured I could always paint it right?  I bought some Citristrip stripping gel to remove the dark stain from the top.  I followed the manufacturer's directions and protected my work area with a tarp, builder paper and a drop cloth.  I used all three, layered, since I was working indoors.  


I applied the gel liberally to the top and let it go to town.


Do you see the grayish/white spots?  At first I thought it was drying.  I tested a spot with my trusty plastic scraper and it wasn't dry at all.  It was just working its magic.  I let the gel sit until I couldn't resist it any longer which was about 15 minutes.  I didn't want the veneer to lift, so I went ahead and scraped away.  This stuff is AMAZING!!!  The old finish slid off like melted butter.  Easy Peasy Lemon Squeezy!

TA-DA!! Pretty wood grain!  Really, isn't it just so pretty!


Yippee, it worked & the veneer was still intact!  Now, this is where I hit a small snag.  There wasn't any veneer on the edges of the top.  (Does that make sense?)  It was only on the top.  So there wasn't anything to strip down to wood grain, just pressed wood.  So I tweaked my plan just a tad.  (You've gotta go with the flow when refinishing furniture!)  I wasn't crazy about the natural wood color against our hardwood floors, so I toned it down with a white wash.  I used Annie Sloan Chalk Paint in Old White, mixed with water, on the top.  The mixture was probably about 3 parts water to one part paint.  I just brushed it on and wiped it off with a soft cloth until I got the effect I was looking for.  After the top was just right, I brushed some more Old White on the edges of the top and went over it with some dark wax so it would sort of blend with the white washed wood tone on the top.  

For the bottom I mixed up some of Miss Mustard Seed's Milk Paint in Lucketts Green with some bonding agent and went to town painting the bottom of the table.   Below is the finished product after some distressing, some clear wax & some dark wax.


I just love the milk paint!  It distressed beautifully and has such a pretty, mottled color to it.  LOVE IT!!  I will certainly be using it again!  (I have some Mustard Seed Yellow just begging to be used for a future project!)   


In the picture below, you can hardly tell that the edge of the top isn't the same as the top itself.  I was so pleased with the final result.  


Now we have our own unique coffee table, in our own unique style!  That is what I love most about painting & refinishing furniture.  You can make it your own.  Even when you have the same coffee table as The Nester, it can still look completely different and work in your home too.  Sa-weet!! 

Here's a final before & after


Tell me, how do you bring a sense of uniqueness to your home??   Last week I shared how I got to help bring a sense of uniqueness to my Sister-in-Laws house.

linking up at:


  Furniture Feature Fridays
Furniture Feature Friday                      
Show Me What Ya Got #125


******************************************
Disclosure:  This post contains affiliate links.